»

Thursday, December 26, 2013

Merry Christmas and diary 2014

Merry Christmas everyone ( a little late as it's Boxing day but I'm on holiday. .).

This year I designed a diary cover  (for the plastic covered Cumberland diary) for my stamp Club members and my downline.

I completed the design using MDS but instead of printing the whole design I decided to print just the  name and date (so that they would be printed in the exact position I wanted them) and then I  physically stamped each one using my MDS design as a guide.

Using MDS for designing is a great way to reduce wastage on card because you can keep working on it till you are happy with the design instead of having to throw away mock ups that you are not happy with. It's a great way to decide on colour combos too:)

Tuesday, December 17, 2013

My New Favorite SU Tool

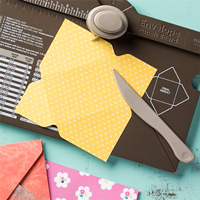
My new favourite Stampin' Up! tool is the envelope punch board.

$38.95

Watch the video here.

This cool little tool delivers sooo much more than it's promise!

Use it to make ...
  • envelopes (of course)
Envelope Punch Board


  • boxes of all shapes and sizes 


  • bows (as in pic above)
  • Christmas Crackers


  • Gift tags


  • file folder cards
I have yet to make one but "google" them. They look amazing.


So really, how can you do without one. Order yours now either online via my "shop now" button or email me.

Clearance rack continues

Just so you know... the clearance rack has no end date. that means news items will be added from time to time. so if you don't want to miss out, click on my "shop now" button from time to time to see if any of your favourites have been added:)

Tuesday, December 10, 2013

Clearance Rack Blitz


“Check out Stampin' Up!'s new Clearance Rack. Fantastic deals on surplus Stampin' Up! products!”

No list (as such) of sale items is available but if you click my "Shop Now" button, it will take you to my online store where you will be able to view what's on special offer. Stocks are stictly limited so I encourage you to order online from there to avoid disappointment. You are welcome to order by email as usual but my order will not go in until tonight and some stocks may have gone by then:)

Happy bargain hunting:)

Wednesday, December 4, 2013

Clearance Sale is coming very soon

Check back here on December 10th to see what Stampin' Up! have heavily discounted for clearance.
My understanding is that there will be retired stock offered for up to 80% off!!!!!!

As these items are "while stocks last", you need to be in quick to avoid dissappointment as they tend to sell out fast .

I recommend you set up an online account now (if you don't already have one) so you can order direct from my blog (use the "Shop Now" button). This way you won't have to wait until my orders come in and possibly miss out.

If you have any questions about setting up your online account, please contact me.

You are welcome, of course, to email me your order but I will have to take pot luck as to what is still available when I put through my order on December 12th.


Friday, November 15, 2013

New Hostess Code

The new Hostess Code to use when ordering online is H6KWPYHG


Ordering online is easy. Just click on the big red "shop now" button on the right side of my home page and it will take you to the ordering area. Just enter a few details to sign up then you can browse the catalogue and "add to cart" anything you want to buy. When you complete your order, just enter the current Hostess Code where prompted. Oh and you will have to pay the full minimum postage and Packaging cost of $9.95 or 5% of your order (whichever is the largest).

Why buy online?
    .because you don't have to wait for my next order
    .because your order will be delivered directly to your door and you don't need to find time to      pick up from my place
    . because you can get in quick for sale items that might othewise sell out

Otherwise I am always happy to receive your order by email and add to my next order:)

Monday, November 4, 2013

Pop up gift

I had seen a few of these pop ups on the web and then I was inspired to make one after seeing one that my friend Paula Reid had made.
I made the Christmas tree of the front using the small stamp from the Mosaic Madness set. (I got my inspiration for this design from trawling the new but sorry, I can't find the original now. I did change it up a bit and used a different stamp and ink).


Sunday, November 3, 2013

Christmas box

This is an amazing box (Christmas or otherwise) that you can make out of a piece of 12 x 12 DSP and requires no cutting or adhesive.Not my design sadly, but you can check out how to make it by clicking here.

the inside fits a few mini treat bars.

I love the DSP from the "In Colour" stack. This particular one was Baked Brown Sugar which actually looks a little gold when accented with the Cherry Cobbler "belly band".

Saturday, November 2, 2013

Something that's not Christmas

ha ha ha. thought you might be getting a bit sick of all the Christmas cards so this is a card I designed using MDS for the Morton Family who very kindly had us over to dinner several times while our kitchen was out of action during the renovation. I love the Black and white elegance of this card.

The stamp set was "Compliments to the Chef" from the main Catalogue or of course, available at a fraction of the cost through MDS. MDS is available to purchase and download though the "buy Now" botton on the top right hand side of my Blog. It comes preloaded with lots of punches, DSPs. stamps etc and any stamp you want you can purrchase online and have it as an immediate download. Cool eh?

If you have any questions regarding any Stampin' Up! product including MDS please email me.

Friday, November 1, 2013

Christmas no 5

The last in the series of 5 cards I designed my my Christmas card classes. this one is not totally myown design as if you look in the Holiday Mini catalogue you will see where I got my inspiration. I however, used the Lovely as a Tree stamp set.
The glitter was dabbed on using the Silver Sparkle Dazzling diamonds (only $5.50 in main catalogue)

Thursday, October 31, 2013

Christmas no 4

The 4th in my series of Chrsitmas cards I designed for my recent Christmas card classes
Sorry the picture quality is not great but this one is the everlasting "Lovely as a Tree" stamp set stamped first in Craft white then in Encore Silver ink onto Pool Party card with a Smokey Slate base.

Wednesday, October 30, 2013

Now available- envelope punch board


Envelope Punch Board
Envelope Punch Board 133774
Price: $38.95
Why go with boring, white, normal-sized envelopes when you can use colorful paper to create everything from itty bitty to long and skinny? Our creativity-boosting Envelope Punch Board makes it easy to customize envelopes in up to 66 different sizes!

Envelope Punch Board includes:
* An easy-to-use chart to create up to 66 different envelope sizes (including standard sizes). The measurements are provided both in inches and centimeters.
* A scoring tool in a convenient storage slot.
* Two punches designed right into the tool itself: one to make the envelope and one to round its corners.


Order online by clicking my "shop now" button ( use hostess code NT7PPVFG when promted) or email me your order .

MDS 30% off sale


Sale ends 30 November
click here to find out more

email me to find out more, otherwise just click the "shop now" button on my blog to take you to my online store. Please add the hostess code NT7PPVFG    when prompted:)

New Holiday Tag it bundle

Oh my gosh, it's one of those time when everything happens at once again...
so many things happening with Stampin'Up!

Get Your Tag It Bundles Today!
available 29 Oct - end November


Click here to find out more

Carve your own stamps


Up until a year ago, (when he sadly died), I had a lovely elderly gentleman customer (Ivan) who (prior to being introduced to Stampin' Up!) used to carve his own stamps out of school erasers. They were absolutely amazing with intricate detail. I remember him fondly with the news that SU is introducing a kit to carve your own stamps. (Available Nov 15)

I bet Ivan is looking down on us and having a wee giggle over this:)

If you have ever wanted a stamp (hmm maybe a cat stamp?) that is not available, now you can make your own. You might even have a special family logo you could make a stamp for.

click here to learn more.
Item #
 Description
 Price
 133402  Undefined Stamp Carving Kit  $34.95 AUD /$39.95 NZD
 134808  Undefined Refill Kit  $16.95 AUD/$19.95 NZD
 124236  Clear-Mount Cling Foam*  $18.95 AUD/$22.95 NZD
*Add a sheet of Clear-Mount Cling Foam to create your own clear-mount stamps. Mounting your stamps on the cling foam allows you to make stamps any size you want, not just what will fit on the blocks in the kit.
Included in the Stamp Carving Kit:
  • 2 carving tools
  • 7.6 x 10.2 cm rubber
  • 7.6 x 10.2 cm foam
  • 4 wood blocks (various sizes)
  • 1 Island Indigo Stampin’ Write Marker
  • 3 postcards
  • Instruction sheet
  • Stamp image templates
Included in the Refill Kit:
  • 7.6 x 10.2 cm rubber
  • 7.6 x 10.2 cm foam
  • 4 wood blocks (various sizes)
  • Instruction sheet

then watch the video to learn how


Christmas no 3

The third in the series of Christmas card I designed for recent classes.
A great way to use the negative space after you have die cut your sentiment (using Expressions Thinlit dies from new holiday mini catalogue). I sued the silver glimmer paper for the "merry" on a background of my favourite Bermuda Bay accented with a strip of silver ribbon and a small piece of 'foil accented' DSP from Winter Frost series from the new holiday catalogue.

Tuesday, October 29, 2013

2nd Christmas card

Another of the Christmas cards I designed for for Christmas Card classes;
You gotta love that Washi Tape. What a quick and easy way to make a card! Accented with Glimmer paper punched with the Mosaic punch.

Papillion

My sister commisioned me to make a punch art card as a thank you for a lady who owns a very special Papillion dog.

I used Stampin' Up! MDS digital programme to help me design the card and printed off some elements and cuttings others.

This is what I came up with.

This what I love about MDS, you can move things around, make them bigger or smaller, changes the colours etc and then you can still build it up 3 dimentionally. I put a string of rhinestones on his collar.


Monday, October 28, 2013

Christmas

I recently taught 5 Christmas cards of my own design. We managed to complete the 5 cards in a little over one and a half hours. Imagine how quickly any one of these cards could be made once you have the design, technique, and resources all to yourself?

Over the next 5 days I will blog each of my designs starting with...

I used the Joyful Christmas set and the Silver Encore ink from the new Holiday catalogue, three rhinestones (which I coloured with a marker) and finished with a mere strip of DSP  (Winter Frost)  along the bottom.

Tuesday, October 22, 2013

25% off sale starts today


Yay! we all love a bargain eh? Stampin' Up! is celebrsting their 25th year anniversary so they are giving us all 25% off a whole heap of stamp sets.

click to view specials

I will be putting in another order next week so email me your order now:)


Monday, September 30, 2013

Christmas is coming...fast

Wow, not even October yet and I have done 4 classes including Christmas cards already.
Here's the one that really inspired me CASed from Delys Cram. Thanks Delys I love it:)
I used Silver Glimmer paper for my "Merry". The card is embossed with the new Pretty Print embossing folder and the "Merry" is die cut using the new Expressions Thinlits. the DSP is Winter Frost. The embellishments are simply gorgeous!!!... "Frosted Finishes Embellishments". All these supplies are available from the new Holiday Mini. Order online through my "shop now" button or email me.

I have designed 5 Christmas of my own but can't reveal them just yet...

Friday, September 20, 2013

New Christmas Single Stamps


Just released, new single stamps never before sold.
Click to view

Single Stamps
If you wish to order email me or order online through the "shop now" button on the top right of my blog.

Kitchen Update

Yay! We're having a kitchen update. The downside though is that with power being off to various parts of the house, I have not had access to my main computer. I know some of you won't believe me but I would have blogged sooner if I could have. he he.

Anyway only another couple of weeks and we should have a brand spanking new kitchen:)

Friday, September 6, 2013

Special offer

There is a new promotion this month for all you butterfly fans!! :)


135311
Butterfly Bundle (Clear-Mount)
Papillion Potpourri Clear-Mount Stamp Set (page 90)
Bitty Butterfly Punch (p183)


 135312

 retail    
$65.90
 15% off price
 $56.02
 savings made
$9.88
Butterfly Bundle (Wood-Mount)
Papillion Potpourri Wood-Mount Stamp Set (page 90)
Bitty Butterfly Punch(pg 183)
 retail    
$73.90
 15% off price
 $62.82
 savings made
$11.08


New "Best Of 25 Years" stamp set available

The next collection of "the Best of 25 Years" stamp set includes our very beloved "Dasher" ! This set will be available from now until the end of April 2014.
 

Monday, September 2, 2013

New Holiday Mini

Yay. The new Holiday Mini catalogue is now live.
click here to browse
At first I thought " oh dear, this catalogue is all about Halloween and Thanksgiving". But on second viewing, I found a heap to love about it. Just a few my favourite additions;

. Pg 9 envelope liner framelit dies - 3 sizesto pretty up the inside of your envelopes

. P12/13 mini  muslin bags- stamp directly onto these for an instant gift bag

.p 25 new Christmas Washi Tape - we all love that Washi Tape eh?

. P27 Joyful Wishes stamp set- imagine this poinsettia flower embossed in gold on vellum...

. P28 Frosted Finishes Embellishments - simply gorgeous in real life! Very classy

. P29 Winter Frost DSP - simply stunning DSP with 2  Sheets of foil   accented designs.- you'll adore them

. P36 Expressions Thinlits Dies - wow! Use these with any cardstock but stunning with the Foil Sheets on p 28 or dazzling Glimmer paper


Thursday, August 29, 2013

MDS card

I was commissioned  last month to make a card for a 13 year old girl. She loves music, the Eiffel Tower and the colour pink. I decided to use MDS and this is what I came up with..


Wednesday, August 28, 2013

Mosaic Madness

 This one I CASed from Kerry Bunting. I used different colours to her for a different look. I think these colours give the card a Moroccan feel. I also added  a strip of our gorgeous Washi Tape. I used the Modern Mosaic emboss folder, Mosaic Madness stamp set and the Mosaic Punch with Island Indigo and Midnight Muse cardstock.


 This cute little paper cup was made from a tutorial I found on our Stampin'Up! demonstrator international Stampin' Connection site. I would very much like to credit the designer but can't for the life of me find it again either on the site or via Google search. If anyone knows of the name of the designer, please let me know. Meanwhile I will try to locate it.


Thursday, August 22, 2013

Apologies Once again

Sorry everyone. Once again I realise too much time has gone by with no blog. I must do better. he he.

This first pic is from a recent class I taught featuring the "spotlight" technique. Usually this is done with a circular spotlight but I had seen a few examples of cards done with the rectangle and after a few different design attempts, I came up with this one. I have used Summer Starfruit and Midnight Muse cardstock with the Pleasant Poppies background stamp.

This second card I designed also for a recent class. I wanted to show my customers how we can stamp on the Washi Tape. So in this card we used several "new" products; paper doilies, Washi Tape, Simply Pressed clay (for the flowers) and candy dots. Just loving those Candy dots. I have a pack of each colour family which I keep in a Clear Mount Stamp case for storage. They are so cheap too (100 pieces for $11.95)


How lovely, I just found out this card has been chosen a "Pic of the week"on the NZSU website:)


Oh yes, I have just discovered that my cats love to play with the inner reel from when you run our of Washi tape. Sherwood can toss it, carry it in his mouth, roll it and it seems ...lose it. LOL. He likes to bury his special toys. I pulled out one of the couch cushions some time ago and found several toy mice, but he seems to have found a new hiding place that I have yet to discover. A well, I have two other rolls of Washi Tape from that set that the cats can have the inners from once I finish them.


Monday, July 15, 2013

New Colour Markers

New Colour Markers

2 July 2013 In the 2013–2014 annual catalogue, we offer the Stampin’ Write Marker New Color Kit (item 130034, page 163) to help you update your Many Marvelous Marker pack. Now, we’ve sweetened the deal. For a limited time, from 15 July until 31 October, you can buy any of the new colours in the pack or on their own! Go on, fill in the missing pieces in your collection or buy the whole lot.
 ITEM  PRICE  DESCRIPTION
 130034
$59.95 NZD
Stampin’ Write Marker New Color Kit
Bermuda Bay, Blushing Bride, Calypso Coral, Crushed Curry, Island Indigo, Pear Pizzazz, Pool Party, Smoky Slate, Soft Sky, Wisteria Wonder
 131899 $7.25 NZD Bermuda Bay Stampin’ Write Marker
 131265 $7.25 NZD Blushing Bride Stampin’ Write Marker
 131902 $7.25 NZD       Calypso Coral Stampin’ Write Marker
 131901 $7.25 NZD      Crushed Curry Stampin’ Write Marker
 131905 $7.25 NZD Island Indigo Stampin’ Write Marker
 131266 $7.25 NZD Pear Pizzazz Stampin’ Write Marker
 131904 $7.25 NZD Pool Party Stampin’ Write Marker
 131898 $7.25 NZD Smoky Slate Stampin’ Write Marker
 131900 $7.25 NZD Soft Sky Stampin’ Write Marker
 131903 $7.25 NZD Wisteria Wonder Stampin’ Write Marker

Tuesday, July 2, 2013

Clay moulds

I made a great discovery when I was preparing for my New Catalogue launch at the weekend. Our Brad containers are the exact right size to contain 2 clay moulds. I decoerated the outside with a strip of Washi Tape and then I attached a pic of the moulds to the lid which I punched out with the 2 1/4" circle punch and adhered to the lid with a Jumbo Sticky Round. All perfect size:)

Saturday, June 29, 2013

MDS - Make a Statement Digital Tour

You will have heard a bit about MDS (My Digital Studio) by now. Are you wanting to know more? Perhaps you have downloaded the programme but are not too sure where or how to start OR perhaps you want to know how it will fit in with your current style of crafting..

Good news.. Stampin' Up! is putting on a MDS road show to give customers and demonstrators some ideas for using MDS.

 For only $45 NZD, discover a range of inspirational projects, ideas and techniques through project displays and engaging presentations. Just bring your laptop and digital images and follow along in our classes to create your own designer photobook—capturing your own cherished memories! You’ll go home with several complete pages—which you can then print, e-mail or upload to the Internet. Classes are designed for beginners, to provide you with a basic understanding of My Digital Studio software.
 
The road show is coming to town on September 7th and registration is being taken from July 2nd. I'll be going, so if you want to join me, let me know.


Click here to view the Road Show promo.

Friday, June 28, 2013

More MDS

MDS is so much more than just a programme to make flat 2D cards and scrapbook pages. (As you will have seen in my last post). I am beginning to use it more and more and growing to love it, especially as a design tool. It saves time and resources to mock up your design on computer before making it into a finished product.

Having said that, I wanted a Teenage boy birthday card that showed a boy wearing gaming headphones. That's what I love about SU, you can have whatever you want with a little imagination and time. This particular boy was given some bright green gaming headphones for his birthday and I wanted the card to match them.

I trawled the net for ideas but obviously this was pretty specific but what I did come up with was the idea of using MDS to design a card with digital "punch art".

I printed this card flat but I equally could have used the idea to make a 3D punch art card or a Hybrid where you print the card and then build it up from there.

This is the card. I love how we can get almost any colour in this programme:)


Thursday, June 27, 2013

Tea anyone?

I am hosting a Stampin Up! "High Tea" this weekend and I made my inviations with the help of MDS (My Digital Studio), the digital programme from Stampin'Up!. I used the Tea Shoppe stamp set to get my out line, then I flipped the image and brought the two images together so they slightly overlapped (giving me a tea cup I could fold in half and would stand like a card.)

I got the idea after seeing an owl card that Bronwyn Eastley had done with MDS in a similar way and then ironically, after I had done my tea cups I saw that Bronwyn had done something similar with a tea cup. Great minds as they say:)

I could have printed the tea cup with the stamped design but didn't want to use all that ink seeing I was making a few inviations so I covered them with DSP.

Although the cups had to then be fussy cut, I was pleased with the result.

This is a pic of one of the finished products.


Saturday, June 15, 2013

Birthday card and Bag-a-Lope

This card was inspired by a card made by Jacque Williams. I made mine using the "bubble wrap" technique. The Bag-a-Lope is a little treat bag made from a Stampin' Up! envelope also made using the bubble wrap technique. My base card and ink used were River Rock which is sadly retiring at the end of this month.


Just as a little reminder, these colours are retiring at the end of this month, therefore the corresponding card, inks, markers will no longer be available after 30 June.
Regal Rose
Pretty in Pink
Bashful Blue
Certainly Celery
Baja Breeze
Riding Hood Red
Bravo Burgundy
Not Quite Navy
More Mustard
River Rock
(N.B. I have highlighted for an idea of colour but these are not true colours)
 

Also a little reminder that the current seasonal mini catalogue is closing at the end of this month. some things may have made it into the new annual catalogue but that announcement won't be made until the 1st of July, so if you really want any of the retiring colours, stamps sets, accessories or anything from the current seasonal mini please email me as soon as posible to put in your order. Or alternatively go to my web www.stampingcraft.co.nz and buy online. Any online orders before July 4th, please enter the hostess code TTPA2XGP

If you would like a new annual catalogue when it becomes available on 1st July, please email me your details.

Friday, June 7, 2013

Birthday card


This is a birthday I designed recently for my Stamp club/class using Melon Mambo and Midnight Muse colours. The frame was embossed using the Designer Frames emboss folder, then lightly songed to highlight. Aren't those Bitty Butterflies cute?

Thursday, May 30, 2013

Simple but effective Butterfly cards

Three cards I taught recently at one of my Stamp Club classes:

 Designed by me. We coloured silver Glimmer paper with a spritzer filled with ink refill and rubbing alcohol.


 Inspired by Patty Braun


 Cased from Mary Fish.

Wednesday, May 29, 2013

Masculine card

 Sometimes we find it more difficult to design masculine cards, probably because we have such a great variety of lovely feminine colours and stamps that attract us to the whole idea of stamping.

I made the frame with the "Designer Frames" embossing folder using heavier weight aluminium foil. You can use the seal from a large can of coffee, milo etc as I did in this case or (as I used for my class) an aluminium oven liner.

My fellow demos gave me great feedback on this one:)

Wednesday, March 13, 2013

Swallowtail

I'm just loving this big stamp from the new mini..in fact I'm loving the new mini full stop.

This is a card I designed for my recent stamp club using the same idea as the front of my brag books that I made for training swaps.

I used mini brads to echo the metal of the Platinum Embossing powder.

Sunday, March 10, 2013

Easter Egg Treat Holder

Boy, isnt this year going fast? or is it just me? Before we know it, it will be Easter so I decided to make this little Easter Egg treat holder for my recent stamp class.

I adapted an idea by Dawn Griffith for the punch art front of this little Easter Egg Treat Holder.
I placed the egg between two tags punched from the "Two Tags" Bigz die joined at the bottom.

Pretty cute eh?

Wednesday, March 6, 2013

Training swaps

I made 17 of these little brag books for my recent SU training. Inside I put the SU clear envelopes which work so well as photo pockets for these little albums. I stamped the Swallowtail stamp in Midnight Muse which is one of the current "in Colours" and comes in the new firm foam style ink pads. The ink stamped from these ink pads stays damp for a few moments so if you are quick, you can pour embossing powder over the image before it dries and then heat set it without the need for versamark. I have chosen to emboss just the centre of the butterfly with platinum embossing powder. With SU's old ink pads, I would have had to stamp my image then restamp with versamark and would have had to use my Stamp-a-ma-jig to make sure it lined up.

Did you also spot the dry embossed detail to the right of the image? That was done with the new "Simply Scored  Borders Scoring Plate"

I have used the same idea for a card which is part of my Stamp Club for this month.

Monday, February 25, 2013

Windback to Christmas

This is a gift box we made at one of my Christmas Card Classes. Those Kraft Gift boxes on page 161 of the main Catalogue are so easy to decorate and good value too at $5.95 for 4 boxes.

Friday, February 22, 2013

Feeling Sentimental?

I designed this card uysing the SAB reward set "Feeling Sentimental". I used the "Split Negative" technique of Craft white ink on Basic Black card and Stazon Black ink on Whisper White card.

I stamped the banners with the background stamp from "Clockworks" (p105 main catalogue).

I love the colour combo of Lucky Limeade and Basic Black. Makes a good masculine card don't you think?

Sunday, February 17, 2013

I made little brag books with my team and also for my Stamp club classes recently. We all needed to put in our own photos and of course my photos are of "my boys".
To see more of my boys click here

Inside the cover are Stampin Up clear envelopes that I slotted DSP into to mount my photos on.

If you would like to make one of these books check out the tutorial published by Splitcoast Stampers here