»

Monday, January 26, 2015

Creative Inkers Occasions Mini 2015 Blog Hop

Welcome to the Creative Inkers Occasions mini Catalogue Bog Hop for 2015. Just click the 'next ' button at the bottom of this post and subsequent posts to hop to the next blog. It would be great if you could leave a comment before you leave my page. If you are unsure of how to do that, click here for more information.

I just love this catalogue and after you have hopped through our blogs, if it you don't already, I just know you will love it too:)

For this blog hop I have made a diary cover. This is a Cumberland diary that has a plastic sleeve cover so you can change the cover easily and the plastic protects it.

I used an idea for the Butterflies thinlits dies that I saw on Deb Valder's blog and I have used the larger of the Butterfly dies, then reinserted it like a jigsaw puzzle piece. I then heat embossed the "Something Lacy" background stamp (with white embossing powder) at the bottom and divided the cover with a strip of White Jute ribbon. I then cut a piece of the Jute ribbon down the centre, formed a bow, then frayed it out and attached it to the centre of the ribbon strip. My background cardstock is Night of Navy and the mat is Bermuda Bay (my all time favourite colour).

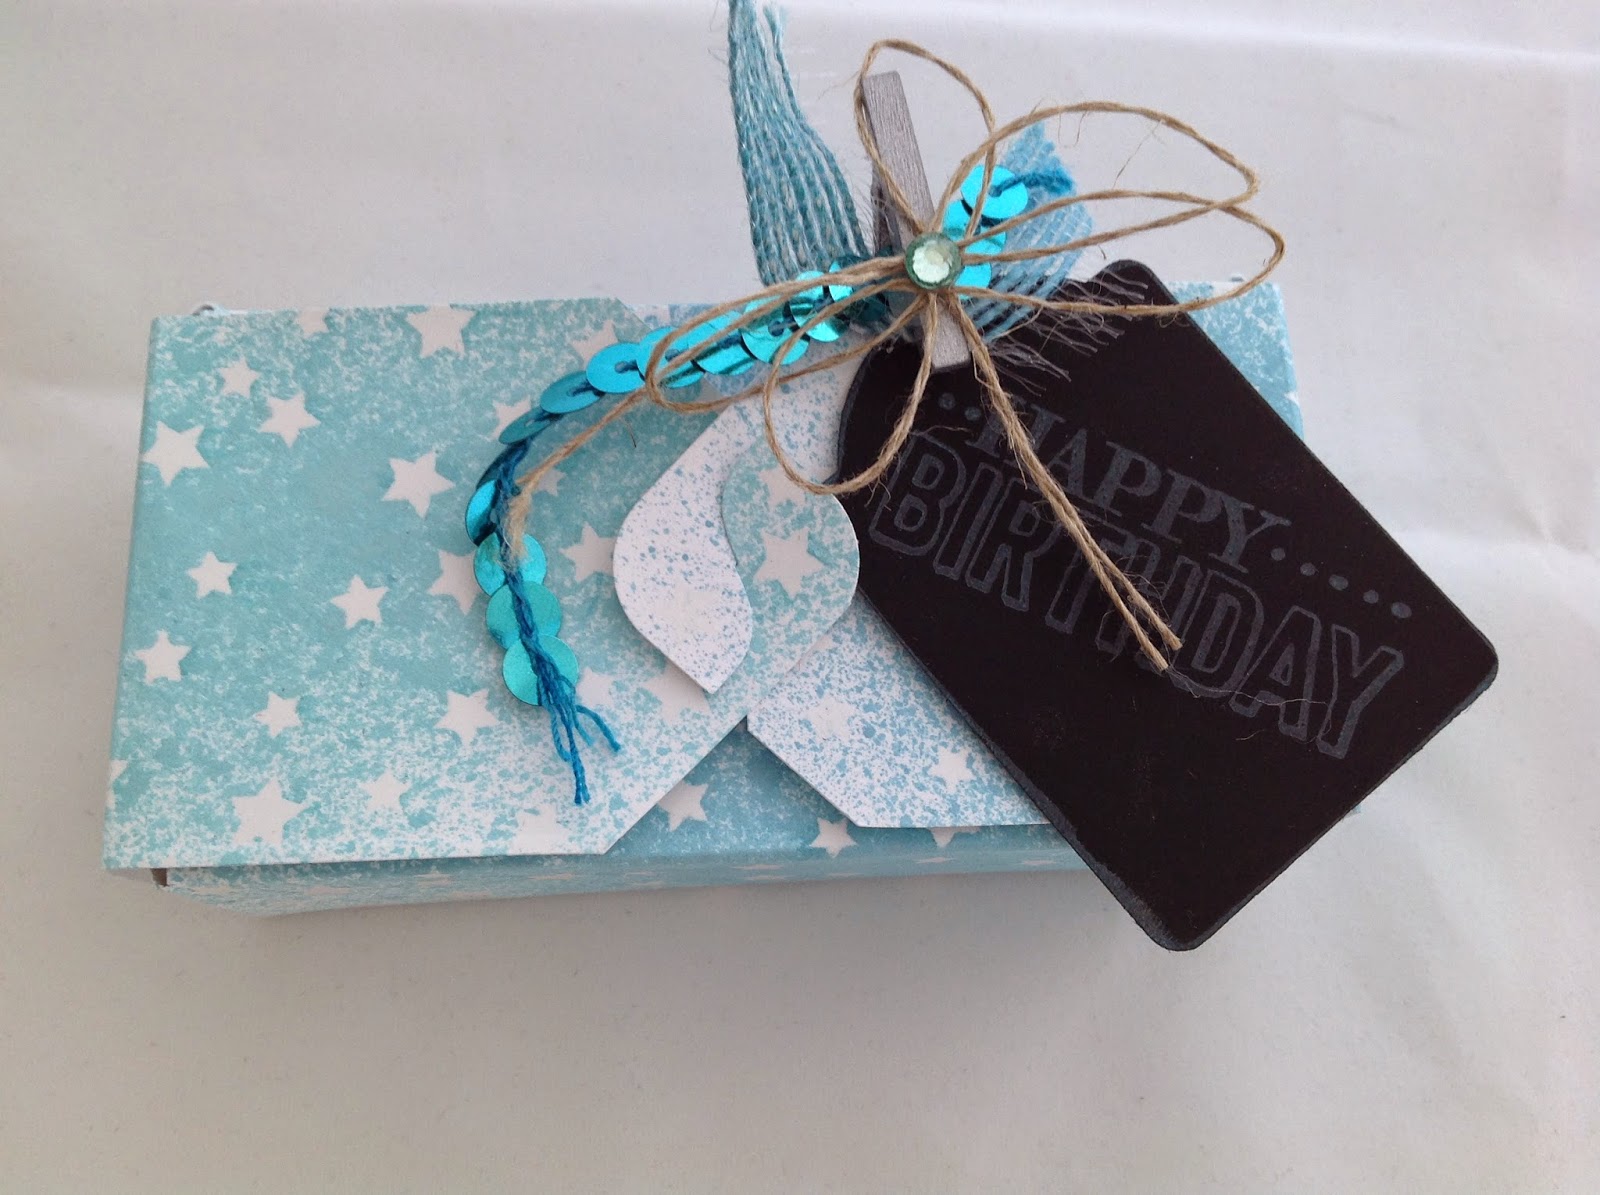
My next project is made with the Mini Treat Bag thinlits. I used the Typeset DSP form the main catalogue . I like the fact that this DSP is lighter in weight than other DSPs and more like parchment.

I have decorated it with a strip of DSP from the Adventure Bound DSP pack , as well as a half doily, a strip of blendy coloured White Jute ribbon and a Brushed Silver bow using the Bow Builder punch.

Now click the "next" button to see what the really talented Ria has in store for you. But don't forget to leave a comment first please:)

http://www.stampinup.net/esuite/home...catalogue_blog


Or the "previous" button to go back to the lovely Lisa's blog for more inspiration.

http://wp.me/pvG5b-1kz


If you should get lost, check the blog links below for a list of participants.


Narelle Hoggard
https://handmadebynarelle.wordpress.com/2015/01/26/creative-inkers-occasions-blog-hop/

Alicia Yap
https://stampcreationswithmunchkin.wordpress.com/2015/01/26/creative-inkers-team-blog-hop-2015-occasions-catalogue-edition/

Kathryn Tyrrell
http://www.aspotofstamping.co.nz/2015/01/occasions-blog-hop.html

Bernie Collins
http://www.stampinup.net/esuite/home/creativeedge/blog

Jacque Williams
http://stamphappy.typepad.com/stamp_happy/2015/01/adventure-awaits-home-decor-creative-inkers-team-blog-hop.html

Rachael Knight
http://knightstamper.blogspot.co.nz/2015/01/creative-inkers-occasions-blog-hop-2015.html

Paula Reid
http://yellowbearnz.blogspot.co.nz/2015/01/creative-inkers-occasions-blog-hop.html

Sally Williams
http://sallystampingdelights.blogspot.co.nz/2015/01/creative-inkers-occasions-blog-hop.html

Delys Cram
https://delysc.wordpress.com/2015/01/26/creative-inkers-occasions-catalogue-blog-hop/

Lisa Bullock
https://daffyscrapper.wordpress.com/2015/01/19/sale-a-bration-creative-inkers-blog-hop/

Heather Stewart
http://stamping-craft.blogspot.com/2...mini-2015.html   YOU ARE HERE

Ria Kaire
http://www.stampinup.net/esuite/home/qraftyqueen/blog

Sharon De Vos
http://sharonsstampingsnippets.blogspot.co.nz/2015/01/creative-inkers-occasions-blog-hop.html

Kathe Oldham
http://jorjarose.blogspot.co.nz/2015/01/creative-inkers-blog-hop-occasionals.html

Debbie Lamb
http://debstampinstyle.blogspot.co.nz/2015/01/the-creative-inkers-occasions-blog-hop.html

Bev Poultney
http://www.stampandscrap.co.nz/blog-hop-occasions-catalogue/

Wednesday, January 21, 2015

Altered Gift Box tutorial

 As promised. I am going to tell you how I achieved this result from the Stampin' Up! Gift Box Punch Board.


The Gift Box Punch Board (pg 14 of new Occasions Mini) is really cool for making various sized gift boxes really quickly. The really cool thing about it is that the reverse punch (behind the main punch part top left) not only rounds the corners but it also cuts a little notch so that when the two ends meet, they intertwine and create a self-closure. (a bit like a yin/yang ).

The punch board makes a lot of different sized boxes but they all have asquare base. I have been waiting for some clever cookie to come up with a new way of using the board because, let's face it) that's what we have come to expect!!:) Well I didn't have to wait long before I found someone (Tanya Bell) who had managed to make boxes with rectangular bases BUT I wanted to keep the cool notched self-closure that this punch board does so well. So...

I decided to experiment to see if I could be that clever cookie. I spent a heck of a lot of time, I admit, but I am chuffed with my results.

Imade a few different sized boxes (other than the ones listed on the board) some with the square base and some with a rectangular base.
This lil' fella is 1 square inch base and about 2 and a half inches tall. Cute.

Anyway on with the instructions for the box that fits the little box of 3 chocolates byGuylian
 Start with a piece of cardstock 8" x 8" (apologies if you don't work in inches).
1. Line it up on the SU Gift punch board at the S (small) start line and score horizontally only.
2. Slide it down to halfway bewteen the XL and L start lines and score horizontally only.
3. Move it slightly to the XL line and score vertically only.
4. Turn the card 180 degrees (to the opposite side) and repeat steps 1-3
 Turn the card 90 degress clockwise
5.Line it up halfway between the L and XL start lines and score horizontally only.
6.Turn the card 180 degrees (to the opposite side) and repeat step 5
 Turn the card 90 degrees clockwise.
7. Line it up with the XL line and score vertically only.
8.Turn it 180 degrees and repeat step 7

That's all the scoring done

Now with the centre scored rectangle portrait orientation, cut off the side triangles to the score line. and then reverse punch the pointy ends to get the closure notch. It will look like this.

Now cut along the scorelines either side of the notched point up the second score line at each end.
Then cut out the top, side triangles each end so that it looks like this.


Fold all score lines and fold up to make the box. No need for glue.It might sound a bit complicated but once you've done it, its not really that difficult:)
I  found a website where Brenda recommends csnipping off the tiny point where the notch tends to stick sometimes to make the closure easier. For clarification, click here to view her idea. I found this works really well.


Monday, January 19, 2015

Creative Inkers SAB 2015 Blog Hop

Welcome to the Creative Inkers SAB Blog Hop for 2015. Once you have checked out my post click the "next' Button below to see what wonderful things Ria has to show you.

Remember to check in again next Monday ( the 26th January) for our Blog Hop featuring the new Occasions Mini catalogue.

I have two projects for to share with you today.


The first is a quick and simple card using the SAB "Irrestistably Yours" DSP as the mat on Basic Grey base card. I have sponged over thre DSP with Pear Pizzazz to reveal the embossed leaf pattern. The image I have stamped is from the 3-step stamping SAB reward, stamp set "Lotus Blossom". I love the monotone effect achieved by stamping the first stamp in Basic Black ink, the second in Basic Grey ink and the third in Smokey Slate ink. (By the way, if you were wondering which is stamp one, two or three: they are numbered on the plastic cling sheet within the set.)

I have stamped the leaves from "Kinda Eclectic" (main cattie) in Pear Pizzazz and sponged the edges with the same colour to finish it off.

And the second project is a box made with the Gift Box punch board from the SAB reward "Irrestistably Yours" DSP that I have spritzed with Bermuda Bay reinker to reveal the embossed star pattern. This DSP is cardstock weight so it is ideal for boxes and other 3D paper craft.

I have stamped the Happy Birthday from the SAB reward stamp set "Big Day" using the new chalk ink and Chalk board paper. Then attached a little Bermuda Bay sequin trim, some White Jute Ribbon cut lengthways and coloured with Bermuda Bay blendies (thanks Julia Leece for that tip:)), some linen thread, a rhinestone coloured with the Bermuda bay blendies and held together with a silver peg.


See inside...

You might notice that the box is not the usual shape you get from the Gift Box Punch board. I worked for a couple of days to find a way to get a box that would accommodate a small box of chocolates with a rectangular base while still having the Gift Box closure, and this is the result:)

If you would like to know how to achieve this yourself, check back in a couple of days and I will load a tutorial.

Now click here
http://www.stampinup.net/esuite/home/qraftyqueen/blog
to check out Ria's beautiful creation(s)


or here
http://daffyscrapper.wordpress.com
to go back to Lisa's amazing project.


Remember to check in again next Monday ( the 26th January) for our Blog Hop featuring the new Occasions Mini catalogue. 

If you should get lost, come back to this page and click on one of the names on the list at the bottom of my page.

1. Narelle Hoggard
https://handmadebynarelle.wordpress....-sab-blog-hop/

2. Alicia Yap
https://stampcreationswithmunchkin.w...-2015-edition/

3. Kathryn Tyrrell
www.aspotofstamping.co.nz

4, Bernie Collins
http://www.stampinup.net/esuite/home/creativeedge/blog

5. Jacque Williams
http://stamphappy.typepad.com/stamp_...blog-hop-.html

6. Rachael Knight
www.knightstamper.co.nz

7. Paula Reid
http://yellowbearnz.blogspot.com/201...-blog-hop.html

8. Sally Williams
http://sallystampingdelights.blogspo...-blog-hop.html

9. Delys Cram
www.delysc.wordpress.com

10. Lisa Bullock
http://daffyscrapper.wordpress.com

11 Heather Stewart   (YOU ARE HERE)
http://stamping-craft.blogspot.com/2015/01/creative-inkers-sab-2015-blog-hop.html

12. Ria Kaire
http://www.stampinup.net/esuite/home/qraftyqueen/blog

13. Sharon de Vos
http://sharonsstampingsnippets.blogspot.co.nz/

14. Kathe Oldham
www.JorjaRose.com

Tuesday, January 6, 2015

Sale-a-bration time AND New Occasions Mini 2015 !!!!


Yay the new mini catalogue is now live. Now to 2 June 2015
click to view
click image to view
http://su-media.s3.amazonaws.com/media/Promotions/NA/2014/12_December/SAB/Headers/vidheaders_SAB_demo_campaign_US_CA.jpg

 Even better, Sale-a-bration is on now to 31 March 2015. So buying from the new catalogue (as well as from the main catalogue) will help qualify you for FREE stuff. We all love FREE stuff, right?

If you don't already know, Sale-a-bration time is when for every $110 you spend in one order, you ge to choose FREE stuff from the Sale-a-bration Catalogue. And, so exciting, one of the FREE options is Blendabilities. Yes! you can earn a FREE set of (3) Blendabilities for spending $110 from now till end March 2015.

Of course, blendabilities are just one option to choose from. to view all options. click on the image below.

http://su-media.s3.amazonaws.com/media/catalogs/2014-2015/2015_SAB/20150106_SAB_en-SP.pdf
click image to view


Sale-a-bration time the THE time to host a party or Join my team.


 http://su-media.s3.amazonaws.com/media/Promotions/NA/2014/12_December/SAB/Host/HostLP_SAB_demo2_SP.jpg


 Wow. If you would like to host a party and earn FREE Stampin' Up! products, email me to arrange a time (your place or mine).

If you would like to join my team of demonstrators and Earn FREE products,continued discount on your own purchases and commissions on sales, email me now.


Saturday, January 3, 2015

Craft Room Makeover

Strictly speaking it's more of a craft area makeover than a craft room makeover as my crafting takes place in my dining room.

My craft area was not real bad to start with but I was starting to get a bit frustrated at not being able to find things so I set to and found some DVD inserts online and the ones I couldn't find I made myself (this part took a bit of time). Then I decided on the containers I needed to buy (I wanted all my emboss powders to be in the same sized containers).Next I set up my labelling machine.

I pulled out everything then stored and labelled the containers.

this is my "before"..
 And here is the "after".

Yay. now i can find things again and it is a pleasure to work in my "craftroom" again.

Next job...the garage. Hmm that could take till February!